Forms are an essential part of HTML that allow users to input and submit information. In this guide, we’ll explain a sample form step by step using a real example.
1. Basic Structure of a Form
All forms begin with the
Example:
2. Input Fields
You can collect user information using
Email Input:
This field is used to collect an email address.
Password Input:
Used to accept a password input that will be hidden while typing.
3. Checkbox
Checkboxes let users select one or more options.
4. Radio Buttons
Radio buttons allow users to select only one option from a group.
Notice how both radio buttons share the same
5. Dropdown (Select List)
A dropdown menu allows users to choose one option from a list.
6. Submit Button
To send the form data, we use a submit button.
7. Full HTML Example
Here’s the complete HTML code saved in an
Conclusion
- Use
- Collect data using
- Use
- Submit data with
Now you’re ready to create your first interactive form in HTML!
1. Basic Structure of a Form
All forms begin with the
<form> tag. The action attribute defines where to send the form data, and the method defines how it is sent (e.g., POST or GET).Example:
<form action="/registeration" method="POST">2. Input Fields
You can collect user information using
<input> fields.Email Input:
This field is used to collect an email address.
HTML:
<label for="email">Email:</label>
<input type="email" id="email" name="email">Used to accept a password input that will be hidden while typing.
HTML:
<label for="password">Password:</label>
<input type="password" id="password" name="password">Checkboxes let users select one or more options.
HTML:
<input type="checkbox" id="remember" name="remember">
<label for="remember">Remember me</label>Radio buttons allow users to select only one option from a group.
HTML:
<input type="radio" id="option1" name="options" value="option1">
<label for="option1">Server 1</label><br>

<input type="radio" id="option2" name="options" value="option2">
<label for="option2">Server 2</label>name. This groups them together.5. Dropdown (Select List)
A dropdown menu allows users to choose one option from a list.
HTML:
<label for="dropdown">Choose a server:</label>
<select id="dropdown" name="region">
  <option value="Region1">Server 1</option>
  <option value="Region2">Server 2</option>
  <option value="Region3">Server 3</option>
  <option value="Region4">Server 4</option>
  <option value="Region5">Server 5</option>
  <option value="Region6">Server 6</option>
</select>To send the form data, we use a submit button.
HTML:
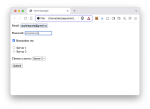
<input type="submit" value="Submit">Here’s the complete HTML code saved in an
index.html file:
HTML:
<!DOCTYPE html>
<html>
  <head>
    <title>Form Example</title>
  </head>
  <body>

    <form action="/registeration" method="POST">

      <label for="email">Email:</label>
      <input type="email" id="email" name="email"><br><br>

      <label for="password">Password:</label>
      <input type="password" id="password" name="password"><br><br>

      <input type="checkbox" id="remember" name="remember">
      <label for="remember">Remember me</label><br><br>

      <input type="radio" id="option1" name="options" value="option1">
      <label for="option1">Server 1</label><br>

      <input type="radio" id="option2" name="options" value="option2">
      <label for="option2">Server 2</label><br><br>

      <label for="dropdown">Choose a server:</label>
      <select id="dropdown" name="region">
        <option value="Region1">Server 1</option>
        <option value="Region2">Server 2</option>
        <option value="Region3">Server 3</option>
        <option value="Region4">Server 4</option>
        <option value="Region5">Server 5</option>
        <option value="Region6">Server 6</option>
      </select>
      <br><br>

      <input type="submit" value="Submit">

    </form>

  </body>
</html>
Conclusion
- Use
<form> to start your form - Collect data using
<input> types: email, password, checkbox, and radio - Use
<select> for dropdowns - Submit data with
<input type="submit">Now you’re ready to create your first interactive form in HTML!